
In comparison to actual equipment and administrations, Microsoft Azure is one of Microsoft’s many cloud-based solutions. Due to their outstanding remarkable measures to develop breakthroughs in the near future, it has the second most notable advancements inside the cloud computing domain. This success can also be attributed to the simplicity with which Microsoft Azure has frequently attempted to process.
AZURE PORTAL OVERVIEW
Microsoft Azure is a cloud-based computing platform used by numerous businesses, government agencies, and other organizations. An Azure portal is an excellent alternative for anyone who wants to construct an app or run a business on the internet without having to install any hardware or software. It will eclipse Windows in recent years as the fastest growing business segment. To save data and perform properly in Microsoft Azure, you don’t require any kind of hardware installation or a large investment in pricey equipment. Microsoft Azure portal services go well beyond simply moving on-premises servers to the cloud.
You also have a full range of Platform as a Service (PaaS) and Software as a Service (SaaS) options as resources, allowing your company to use cloud-based services without having to manage a server. For example, you can set up a WordPress-compatible website or create a basic website without having to configure (or repair) the base Windows or Linux server. Other app and website creators can use Azure storage and resources sans worry or risk because it provides complete security and assurance while being simple to use.
BENEFITS OF MICROSOFT AZURE PORTAL
The most obvious benefit of the Azure administration portal is that it eliminates the need for additional hardware costs such as purchasing and conjuring. With the help of this cloud-based interface, you can effortlessly manage anything. You can save a lot of money that would otherwise be spent on expensive hardware devices, as well as the installation and management of those devices. An extra cost of electricity would be a significant saving that could be used toward other elements of the business.
Because the new Azure interface is virtual, there are fewer chances of failure and downtime, which could otherwise disrupt corporate operations. Virtual hardware resources may scale up and down in a way that physical hardware cannot, allowing Azure-based websites to handle abrupt spikes in demand. Many larger enterprises that need to meet compliance and data storage requirements while maintaining security find this platform to be ideal because it allows for a variety of customizations while maintaining the highest level of protection.
It provides developers with immediate services for developing mobile apps, designing, and connecting to online storage using the most up-to-date technologies. Microsoft has made significant investments in the machine learning portal and artificial intelligence idea, making it much easier for users to access and work remotely.
As the name implies, Azure Portal is a single portal or junction that allows you to access and administer all of your applications from one location. It enables you to create and monitor everything from simple web applications to sophisticated cloud structures.
FEATURES OF AZURE PORTAL
A handful of the features and functionalities provided by the portal with azure service constraints are listed below:
A) Single Point Management
It’s a point and a network that enables users to access, make adjustments, make revisions, and receive add-on capabilities that are really beneficial to the business. The customized user interface makes it simple to use your program and get the most out of it. When it comes to investigating Azure’s graphical capabilities, it ensures a great level of freedom.
B) User Experience
Having your applications tailored to your line of work is the cherry on top for any individual or company. It gives you access to a platform on which you can handle business-related operations and keep track of issues that need to be addressed. This feature gives you access to a variety of platforms, which you can add or remove as needed.
C) Access Control and Security
Whenever it concerns any system that involves millions of businesses, security is paramount. The Azure Portal adds to the emerging cause by giving administrators entire authority over who has access to which services. This is frequently accomplished by granting individual and group-level Role-Based Access Controls and Subscriptions.
D) Powerful usage experience
It provides tens of thousands of services, either open-source software or those that are part of the Microsoft software stack. These services are now very simple to comprehend and use thanks to Azure. The amount of combinations is enormous since even a layperson may mix these to produce a great unified effect. As a result, I’ll be able to let you do the permutations here. It aids in the processing of data as well as providing security services.
E) More Visibility
One of the most basic aspects of Microsoft Azure is the ability to track both current and anticipated charges. You might be wondering how Azure can aid us at this point. It allows you to quickly compute existing charges. It also aids in the forecasting of your monthly expenses. We must have confidence in our ability to access particular management portals. The Azure Portal makes it easier to manage and monitor the analytics component, making it easier to perform business operations. We’ve now delved into the nitty-gritty details of this portal, but the concept of perspective allows us to check and have deep access to the gateway.
AZURE SERVICES
The Azure interface is the primary interface through which users can access the portal. It features a customizable dashboard that gives relevant information for different services, as well as an interface that assists users with portal settings and additions.
With the help of the Azure resource manager, you may manage numerous resources from the Azure portal administration. Various interfaces are employed in this management to ensure proper and seamless operation.
The Azure portal assists you with portal management, as well as monitoring and managing Microsoft Azure accounts and tasks in the Azure interface. The Azure portal sign-in procedure is straightforward. You’ll need to sign in to the Microsoft portal. You will be given a customized dashboard to monitor the functionality of your applications. The user can also study logs and keep track of stuff. 24/7 customer support is available to answer your questions, as well as a cloud engineer to assist you. They’ll also help you keep track of your Azure account. Certain warnings and notifications are pre-installed to inform you of any security flaws or hazardous bugs.
The security center service providers operate well with a security firm to determine how successfully the account is secured and managed. A Cost Management Center allows for cost analysis based on consumption and the avoidance of hidden expenditures. It also suggested a data-related waste reduction approach.
Exploring Azure Portal
Step1:
First and foremost, an Azure account, either free or premium, is required. All that is required is a visit to the ‘portal.azure.com’ website. Fill in your information. Azure also provides free solutions or vouchers which could be used for a month. It’s important to note that you’ll be asked to input your credit or debit card information. However, you can rest confident that Azure will not bill you against your permission.
Step2:
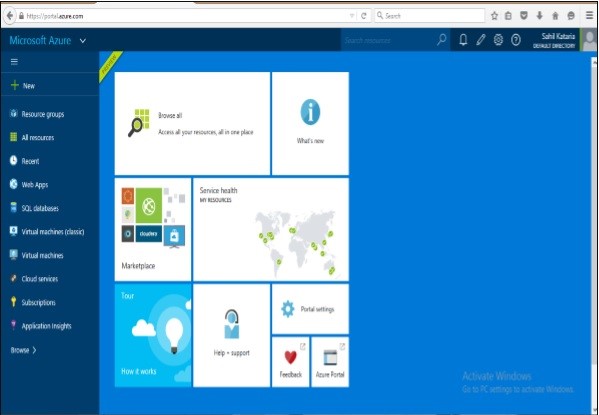
Once you’ve created an account, log in and you’ll be taken to the portal shown below:
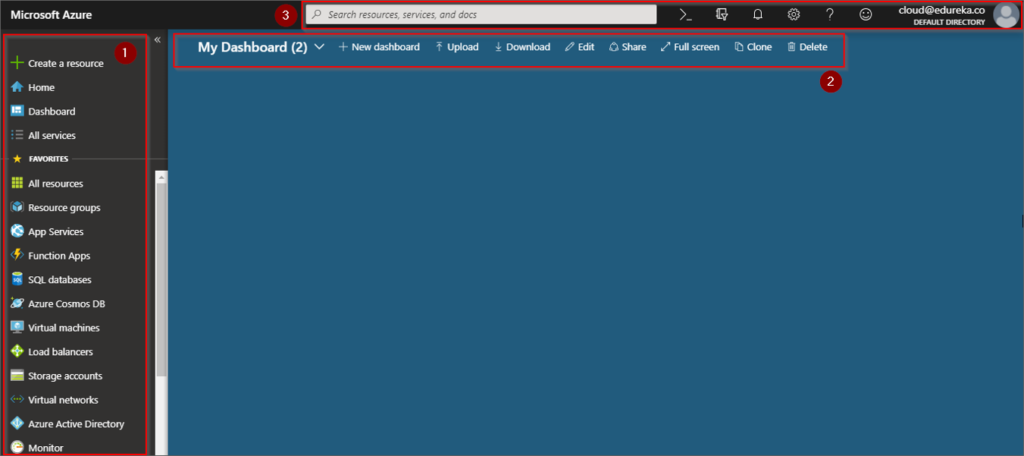
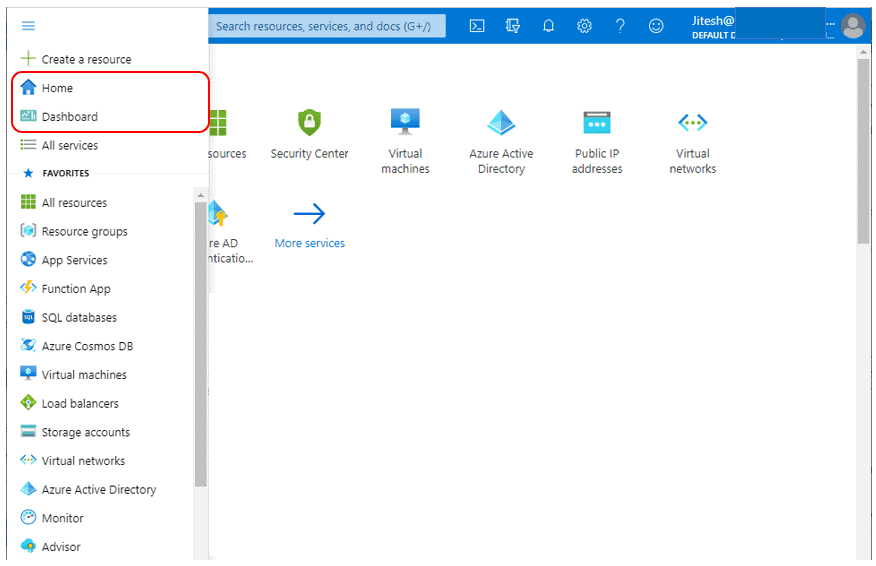
The left side of the graphic above allows you one-click access to all of the service domains. The dashboard, which is blue in color and is empty by default, can be pinned to it if any programs are up and running. On top of that, there’s a search box where you can look for services and resources that aren’t currently displayed on the screen.
Step 3:
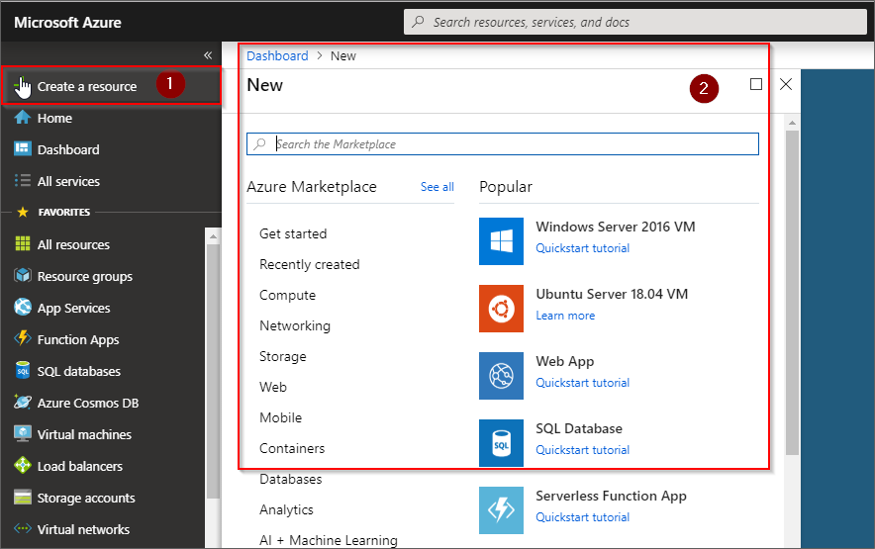
You may create apps, mobile apps, chatbots, virtual machines, and more by selecting the Create New tab.
Step 4:
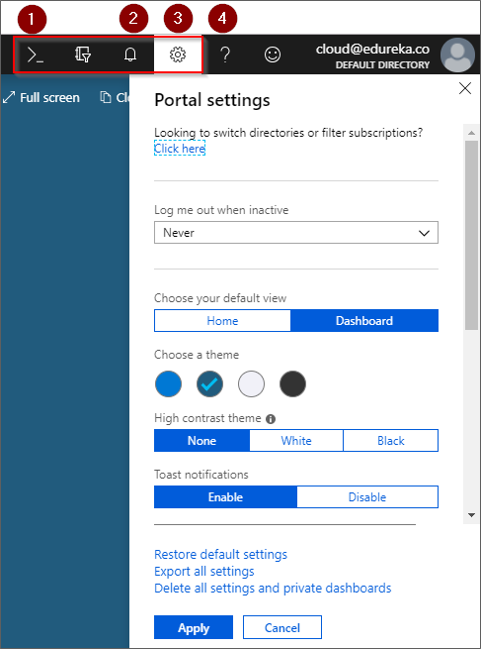
Take a peek at the top left corner of the image. The following tabs can be found. The first is the Cloud Shell, a command line interface that allows you to process data using a command prompt. The second option is the Notifications tab, which displays all of your recent activity notifications. The third tab allows you to explore portal settings, while the fourth tab allows you to search for Azure help.
Microsoft Azure – Management Portal
As the name suggests this is an entry to oversee Azure administrations, which was delivered in 2012. This is a stage given by Microsoft to its Azure clients where they can see, oversee and purchase the administrations presented by Azure. An alternate entry called ‘Azure Preview Portal’ was delivered by Azure group in 2014, which makes it simpler to get to the stage on mobiles and tablets. Notwithstanding, highlights are pretty much the same in both entries.
Accessing the management portal −
Step 1 − Go to https://manage.windowsazure.com
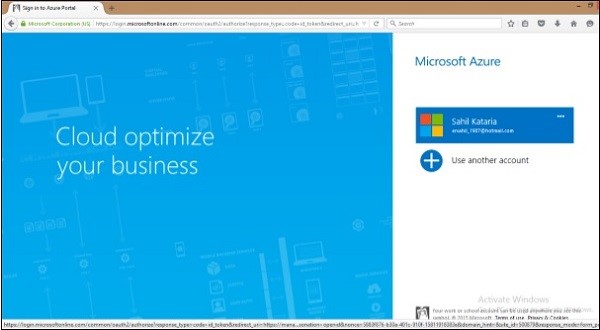
Step 2 − Use your Hotmail or Live ID to log in. Sign up for an Azure account if you don’t already have one. You will receive a free trial and will be able to use Windows Azure to explore, learn, and create your own applications.
The following screen will appear.
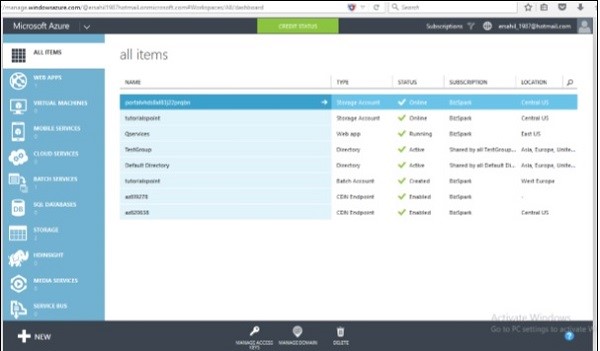
Because we already have a program running, you will see a list of them here. For the first time, your profile will just be empty. The left side categorizes the app, while the middle section includes all of the apps on the account.
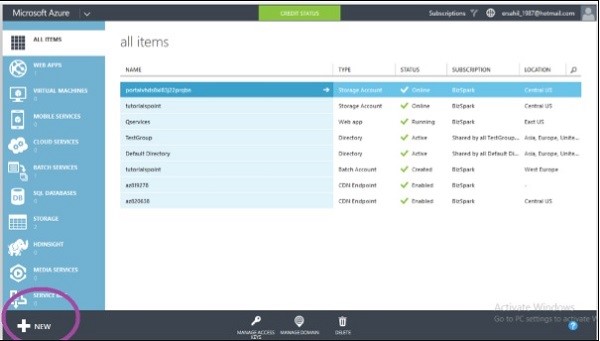
Create a New Application
Step 1 − Click on the ‘New’ left bottom corner.
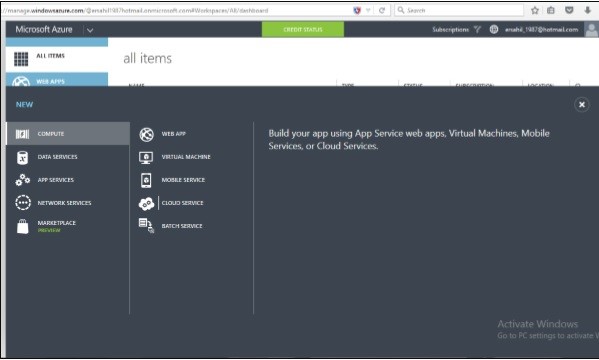
Step 2 − Following screen will come up and you can choose what you want to create.
Check Credit and Subscriptions
Step 1 − Click on ‘Credit’ in the green block at the top of the screen.
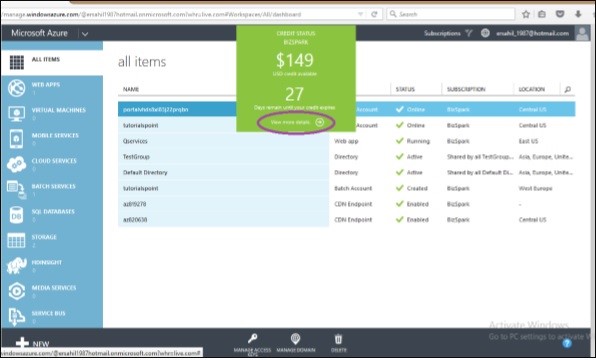
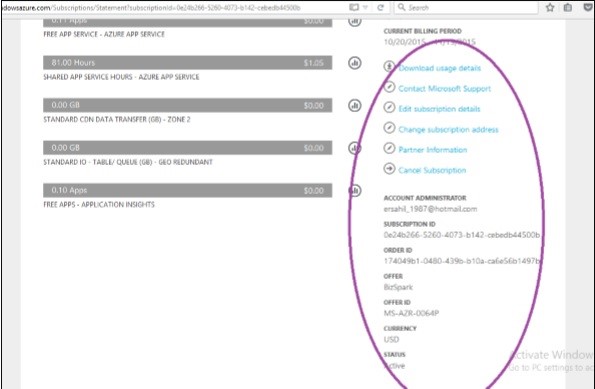
Step 2 − Click on ‘View more details’. It will take you to the following screen. This screen will show you all the details of your subscription, spending, and data usage.
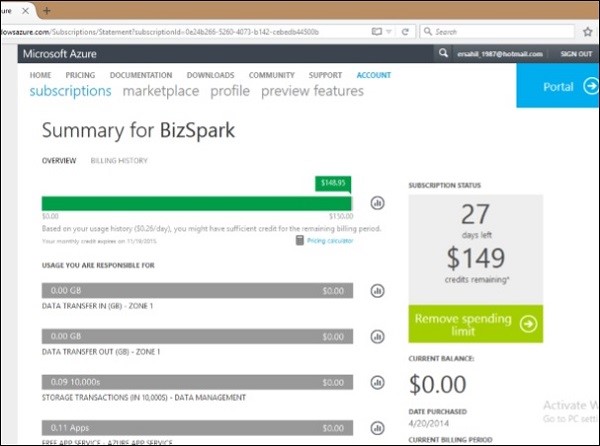
It reads ‘Remove Spending Limit’ since the spending limit is set here. It would have said ‘Established Spending Limit’ if the limit had not been set. You can set a spending restriction for yourself this way. When you hit the spending limit, your services will be terminated.
You can see everything that comes with your subscription if you scroll down the page in the above image and look at the information on the right side.
The user will be totally in charge of your spending. The green square in which ‘Credit’ button is shown will change tone assuming you are going to miss the mark regarding your credit. This is determined by your normal each day spending and it would tell you in how long your credit will move past
Adding a New Subscription
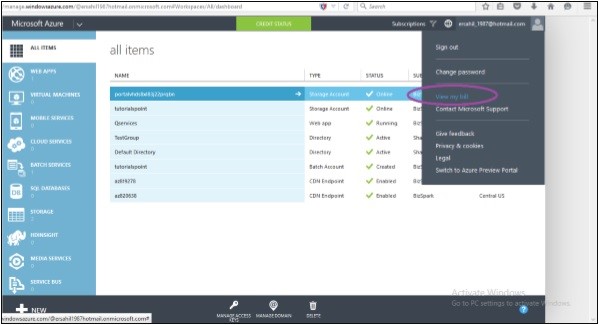
Step 1 –The user should click on their account e-mail id or on the picture at the top right corner of the screen.
Step 2 − Select ‘View my bill’ in the list.
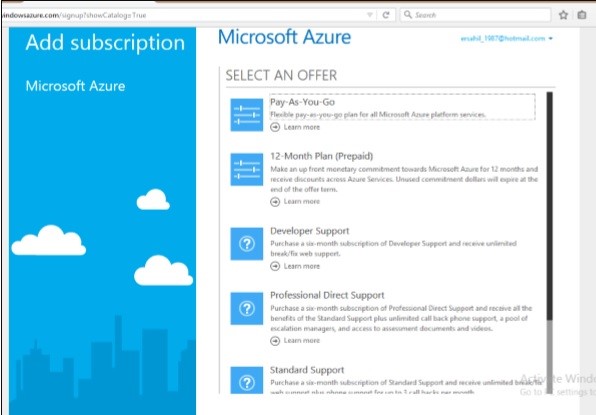
Step 3 –The following screen will appear. Select ‘add subscription’.

Step 4 –The user can choose his subscription of choice from the following screen.
Azure Preview Portal
Step 1 –Select User account e-mail at the top right corner.
Step 2 − Select ‘Switch to Azure Preview Portal’.
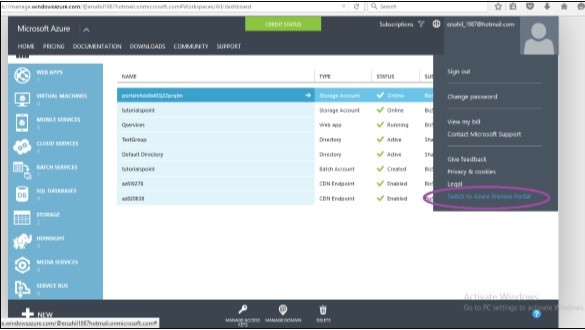
Step 3 –In the next screen, the functionalities are the same. ‘Azure Preview Portal’ has been built for mobile and tablet screens with a responsive design.
Azure Portal Settings
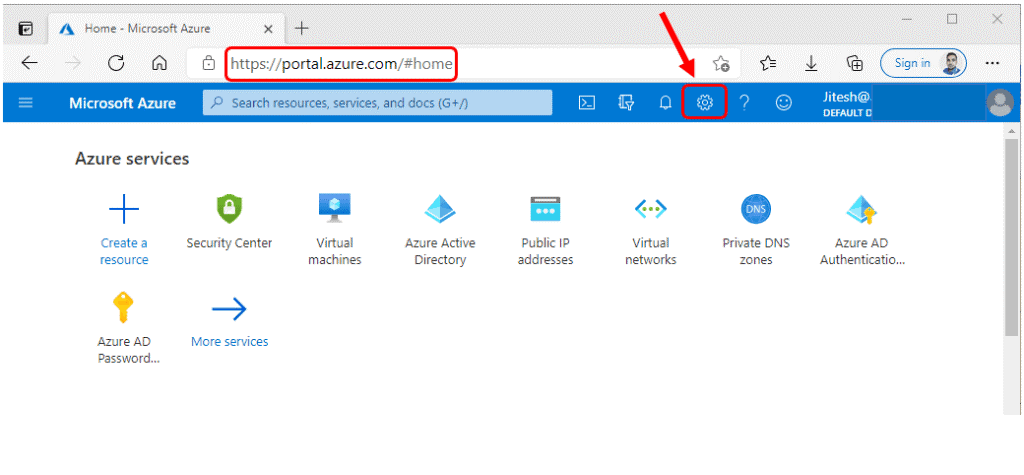
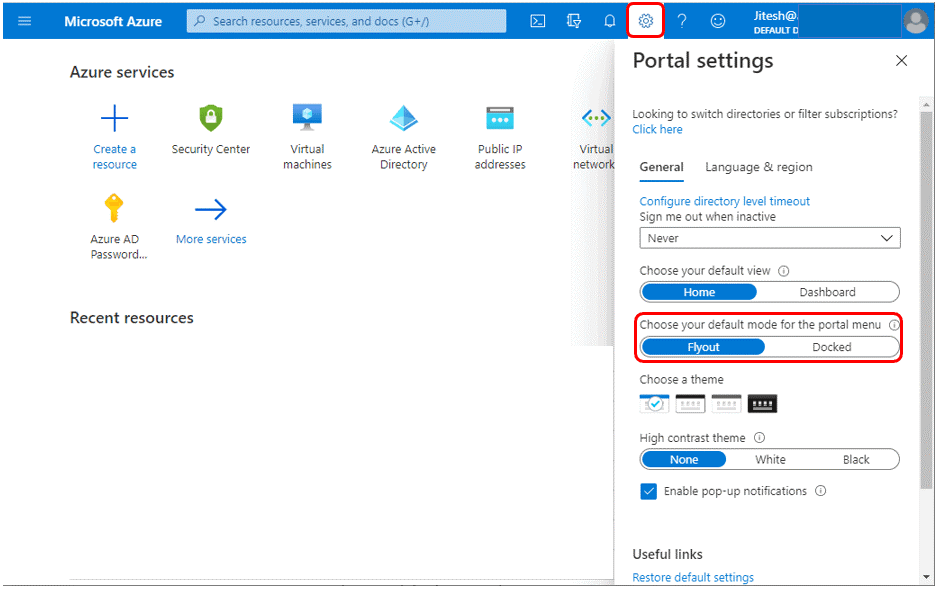
- Sign in to the Microsoft Azure portal.
- Here you can change the default settings of the Azure entryway to meet your own preferences. To design the Default mode for Menu, explore to Portal Settings and pick the General Tab.
Azure Portal Settings and Preferences Walkthrough | Microsoft Azure
Choose Default View – Azure Portal
- To rapidly switch between Home and Dashboard view. When you initially log in to the Azure portal, the default display is Home. You can change the default landing page here. When you sign in to the Azure portal, the selected change is applied automatically.
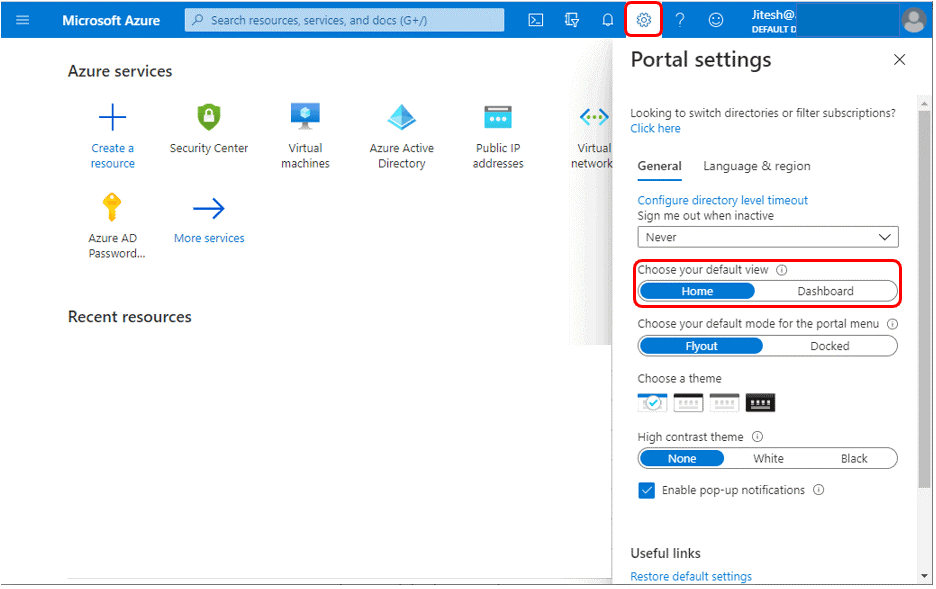
Choose Default View – Azure Portal Settings and Preferences Walkthrough
- Azure Home -This default view will appear as you sign in to the Azure portal for the first time.
- Azure Dashboards – This is a customized dashboard view of your choice.
Choose Default View – Azure Portal Settings and Preferences Walkthrough
Choose Default Mode – Azure Portal
The portal menu’s default mode determines how much room the portal bar occupies on the page. Choose your default mode for the portal menu and then select the default choice between Flyout and Docked to configure the Default mode for the Azure Portal Menu.
Choose Default Mode – Azure Portal Settings and Preferences Walkthrough
Flyout Mode–When the entryway menu is in Flyout mode, it’s concealed until you want it. Select the menu symbol to open or close the menu. This option will be helpful when you are on a small resolution.
Flyout Menu – Azure Portal Settings and Preferences Walkthrough
Docked Mode– If you pick Docked mode for the entryway menu, it’s noticeable 100% of the time. You can collapse the menu to provide more working space.
Docked Menu – Azure Portal Settings and Preferences Walkthrough
Choose a Theme or Enable High Contrast – Azure Portal
The background and text colors in the Azure interface are affected by the theme you select. You can choose from four color schemes: Azure, Blue, Light, and Dark. To discover the theme that best suits you, select each thumbnail.
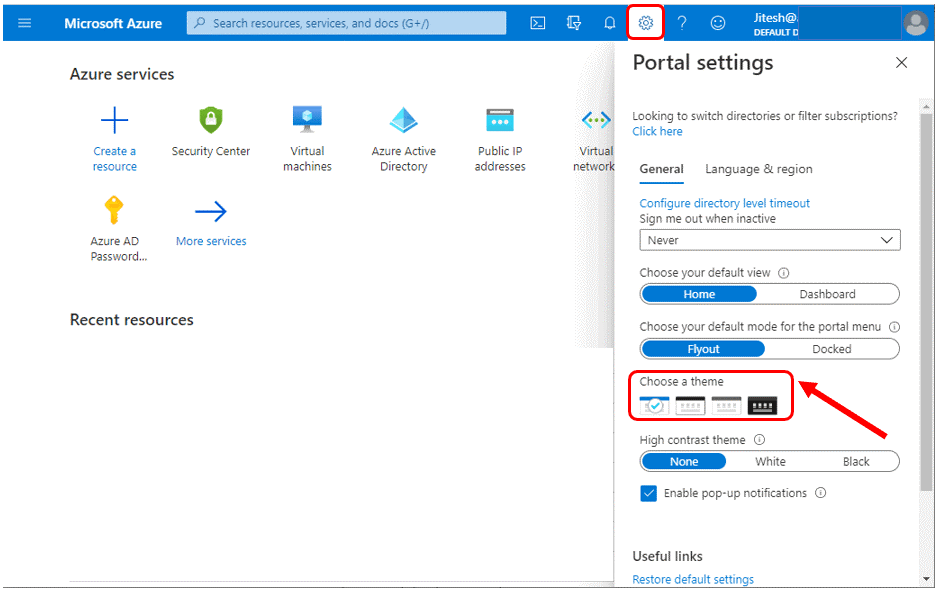
Choose a theme – Azure Portal Settings and Preferences Walkthrough
You can also use one of the high contrast themes, such as White or Black, to make the Azure portal easier to read for persons with vision impairments.
Note – If you pick a high differentiation topic, White or Black, they abrogate any remaining subject determinations. As a matter of course, it’s set to None.
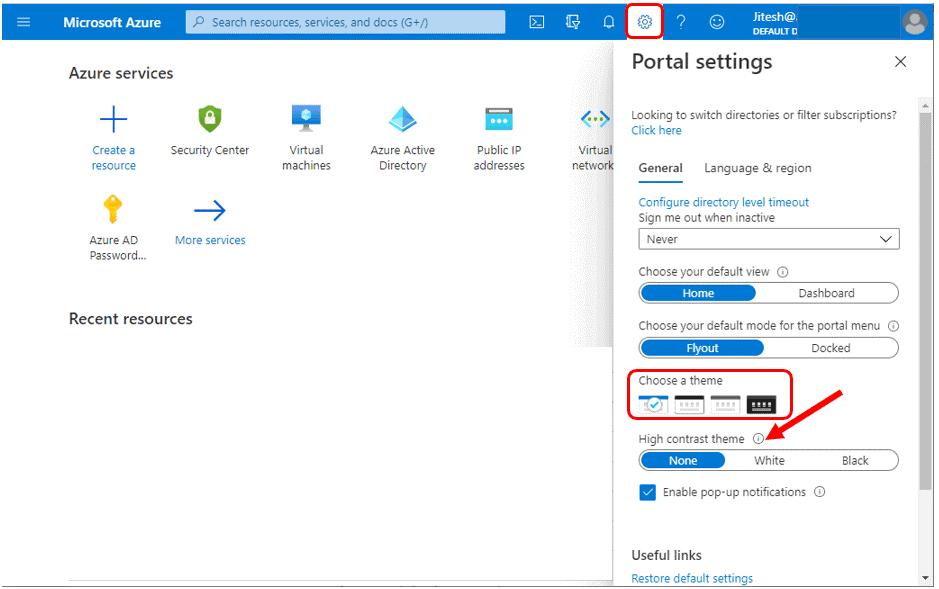
Enable High Contrast theme – Azure Portal Settings and Preferences Walkthrough
Here we have set the White high contrast theme.
White high contrast theme – Azure Portal Settings and Preferences Walkthrough
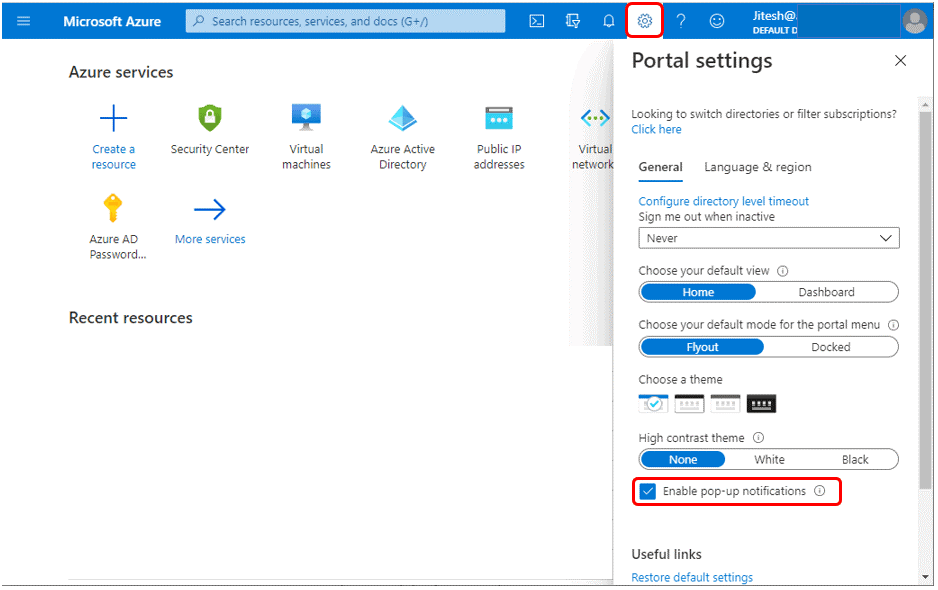
Enable or Disable pop-up notifications – Azure Portal
Notifications are communications from the system that are relevant to your current session. They may convey information such as your current credit balance, when newly developed resources become available, or confirmation of your most recent action.
Check or uncheck the box to enable or deactivate pop-up alerts. Allow pop-up notifications to appear.
Whenever spring-up notifications are turned on, the messages momentarily show in the top corner of your screen.
Enable or Disable pop-up notifications – Azure Portal Settings and Preferences Walkthrough
Change the inactivity timeout setting – Azure Portal
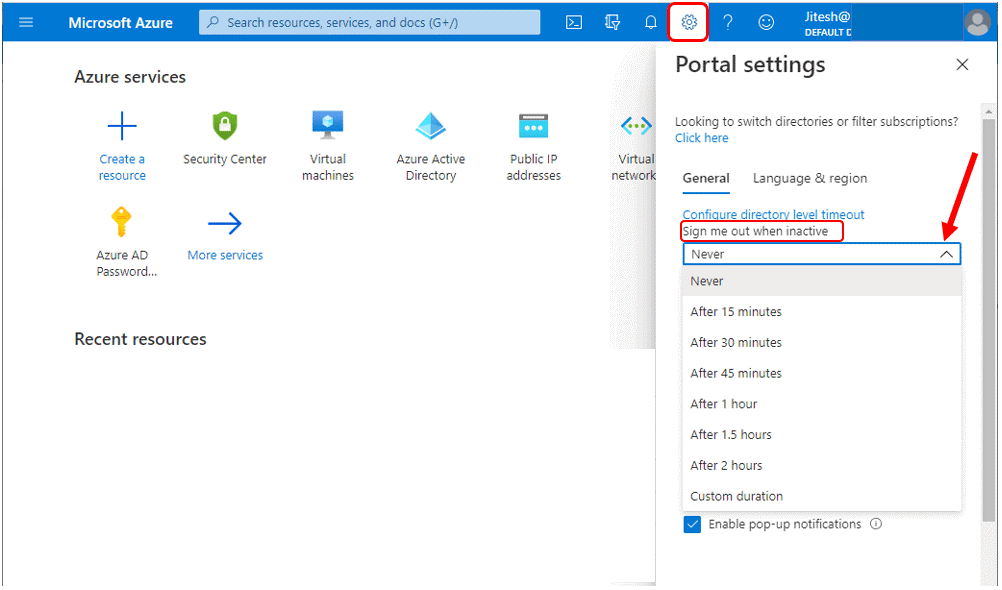
If you neglect to safeguard your workstation, the inactivity timeout option helps to prevent resources from unauthorized access. After a period of inactivity, your Azure portal session is automatically signed out. You can alter the timeout setting for yourself as an individual. If you’re an admin, you can set it for all users in the directory at the directory level.
Individual timeout settings can be changed (user)
- Under the General tab of the Azure Portal settings. When inactive, select the drop-down menu under Sign me out. When you are idle or inactive, you can choose how long your Azure portal session will be signed out.
Change your individual timeout setting (user) – Azure Portal Settings and Preferences Walkthrough
Change the directory timeout setting (admin)
The maximum idle time before a session is signed out can be enforced by administrators with the Global Administrator role. At the directory level, the inactivity timeout setting is used. For fresh sessions, the setting takes effect. It won’t affect users who are already logged in right away.
Assuming that you’re a Global Administrator, and you need to uphold an inactive break setting for all clients of the Azure gateway, follow this progression
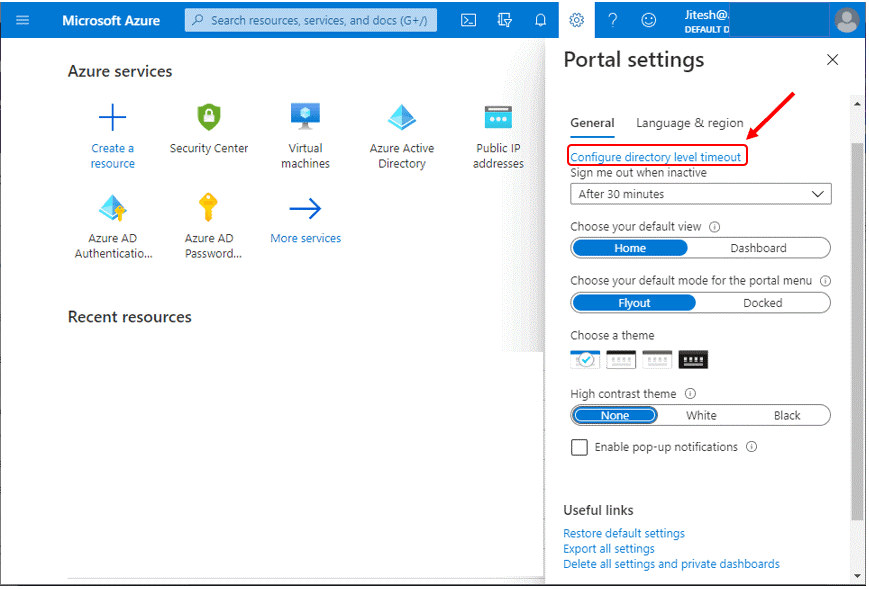
• Select Settings from the worldwide page header. Select the connection text Configure Directory Level Timeout.
Change the directory timeout setting (admin) – Azure Portal Settings and Preferences Walkthrough
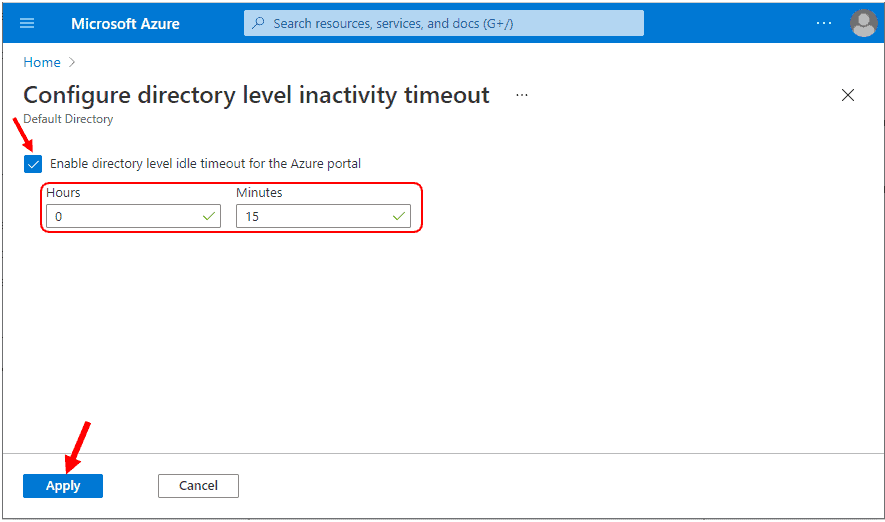
• On the Configure catalog level inactivity timeout break page, select Enable Directory levelidle timeout for the Azure entryway to turn on the setting.
• Then, please specify the hours (between 0 and 23) and minutes (between 0 and 59) for the maximum duration a user can be inactive before their session is automatically signed out. Apply should be selected.
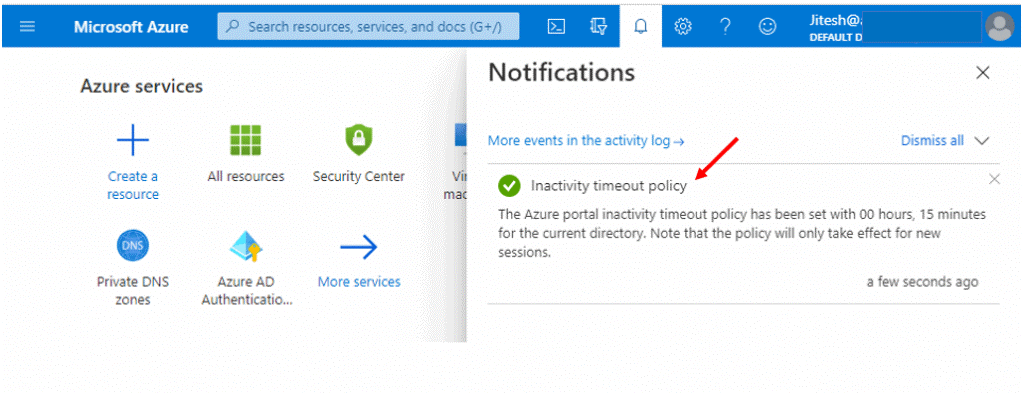
Configure directory level inactivity timeout – Azure Portal Settings and Preferences WalkthroughTo confirm if the inactivity timeout policy has been set correctly, the user should select Notifications from the global page header. Check whether a success notification is listed.
Note – The setting only takes effect for new sessions. It will not immediately affect any user who is already signed into the system.
Configured inactivity timeout policy – Azure Portal Settings and Preferences Walkthrough
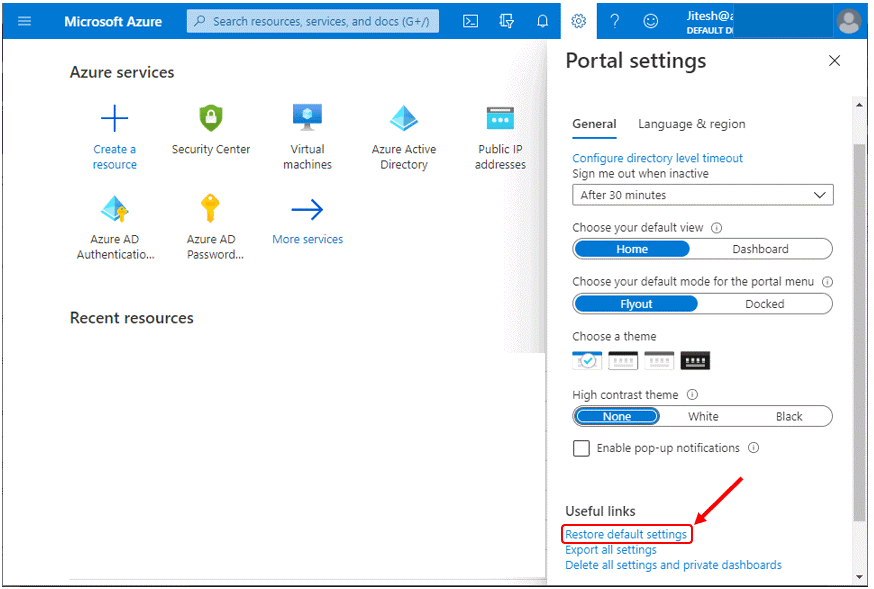
Restore Default Settings – Azure Portal
You can instantly restore Azure Portal’s default settings. Select Restore default settings if you’ve made changes to the Azure portal settings and want to undo them.
Note – Any changes that have been made to the Azure portal settings view, theme, and menu docking will be lost. This option does not apply to dashboard customizations.
Restore default settings – Azure Portal Settings and Preferences Walkthrough
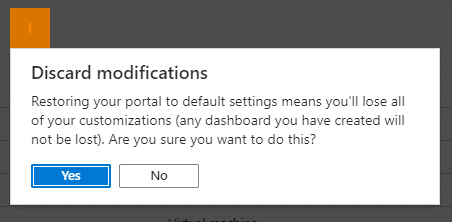
- If you want to reset the dashboard to default settings, a warning confirmation box will show after you pick the option. Select Yes to confirm. The Azure Portal Settings will be reset.
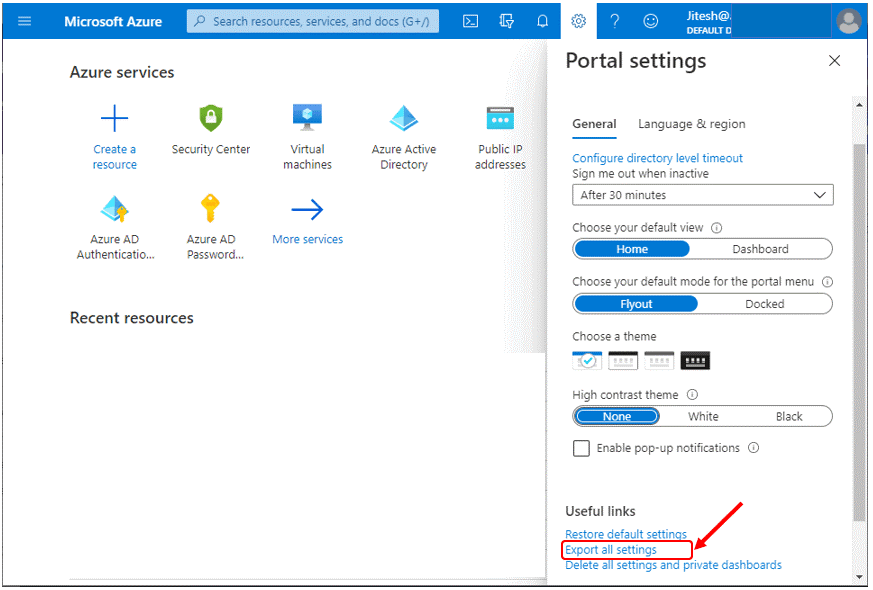
Export User Settings – Azure Portal
Azure stores information about your custom settings. The following user data can be exported —
- In the Azure portal, you can create private dashboards.
- Favorite subscriptions or directories, as well as the last logged-in directory, are all user settings.
- Themes and other customized portal options are available.
If you’re going to remove your settings, it’s a good idea to export and check them first. It can take a long time to rebuild dashboards or redo settings. Select Export all settings to export your portal settings.
Export all settings – Azure Portal Settings and Preferences Walkthrough
- Export settings automatically download the settings.json file with all configurations.
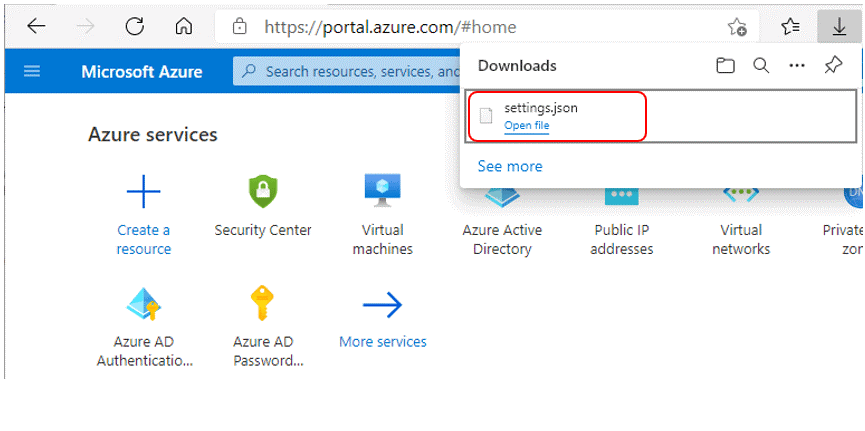
Export all settings – Azure Portal Settings and Preferences Walkthrough
FREQUENTLY ASKED QUESTIONS
- Where is Azure support available?
In markets where Azure is available, billing and subscription management support are included for all Azure customers. Customers who have purchased a support plan get access to technical support. After wide release, some services may not be available in all regions at the same time.
- How can I get technical support?
Basic self-help resources are provided free of charge to all Azure customers. A paid support package is required for one-on-one technical assistance.
- How can I get support if I don’t have a support plan?
Q&A is a community channel where you can discuss ideas with community experts, Microsoft employees, and other Azure customers to get answers to your technical issues. The powerful search function delivers results from a wide range of sources, making it a useful self-help tool.
Even if you don’t have a paid Azure support plan, you may be eligible for limited Azure help if you’re a member of the Microsoft Partner Network, Microsoft Developer Network (MSDN), or Microsoft for Startups. To learn more about your assistance options and advantages, look at your service terms and conditions.
Subscription management support (such as billing, quota modifications, and account transfers) is included in your Azure subscription at no additional cost via the Azure portal. Access to the Azure status dashboard, the Azure Community Support forum, and Azure on Q&A are also included.
- Are all data stored in Azure encrypted?
Storage Service Encryption is available for all new and existing storage accounts in Azure. By default, your data is protected.


0 Comments